Health & Wellness
Target Heart Rate Calculator
Use the Karvonen method to compute target heart rate zones based on age, resting heart rate, and intensity.
Plan training intensity with this target heart rate calculator using the Karvonen reserve method. Enter age, resting heart rate, intensity, and a max formula to see a precise bpm target, zone ranges, and session guidance. The wheel graphic and tables clarify easy, moderate, and peak efforts for workouts, coaching notes, and safer progress during cardio sessions and recovery planning today.
Results
Enter inputs and calculate to see your zones.
Heart rate zone wheel
Wheel highlights your selected intensity inside the 50-100% HRR zones.
Intensity gauge
Moderate intensity is typically 50-70% HRR.
Target zone table
| Zone | Intensity | Range (bpm) |
|---|
Session guidance
Warm up and cool down in the light zone before harder efforts.
Formula comparison
| Formula | Estimated max HR | Target at selected intensity |
|---|
Formulas are estimates. A measured max is the most individualized.
Safety checks and stop signals
If you have a heart condition or take rate-limiting medication, ask your clinician for custom zones.
Precautionary measures
These reminders support safer training alongside your target zones.
Method details
This calculator provides estimates only and does not replace medical advice or supervised exercise testing.
Heart anatomy map and safety overview
This high-resolution heart image highlights the main chambers, valves, vessels, and electrical system so you can connect your heart rate zones to the anatomy that powers them.
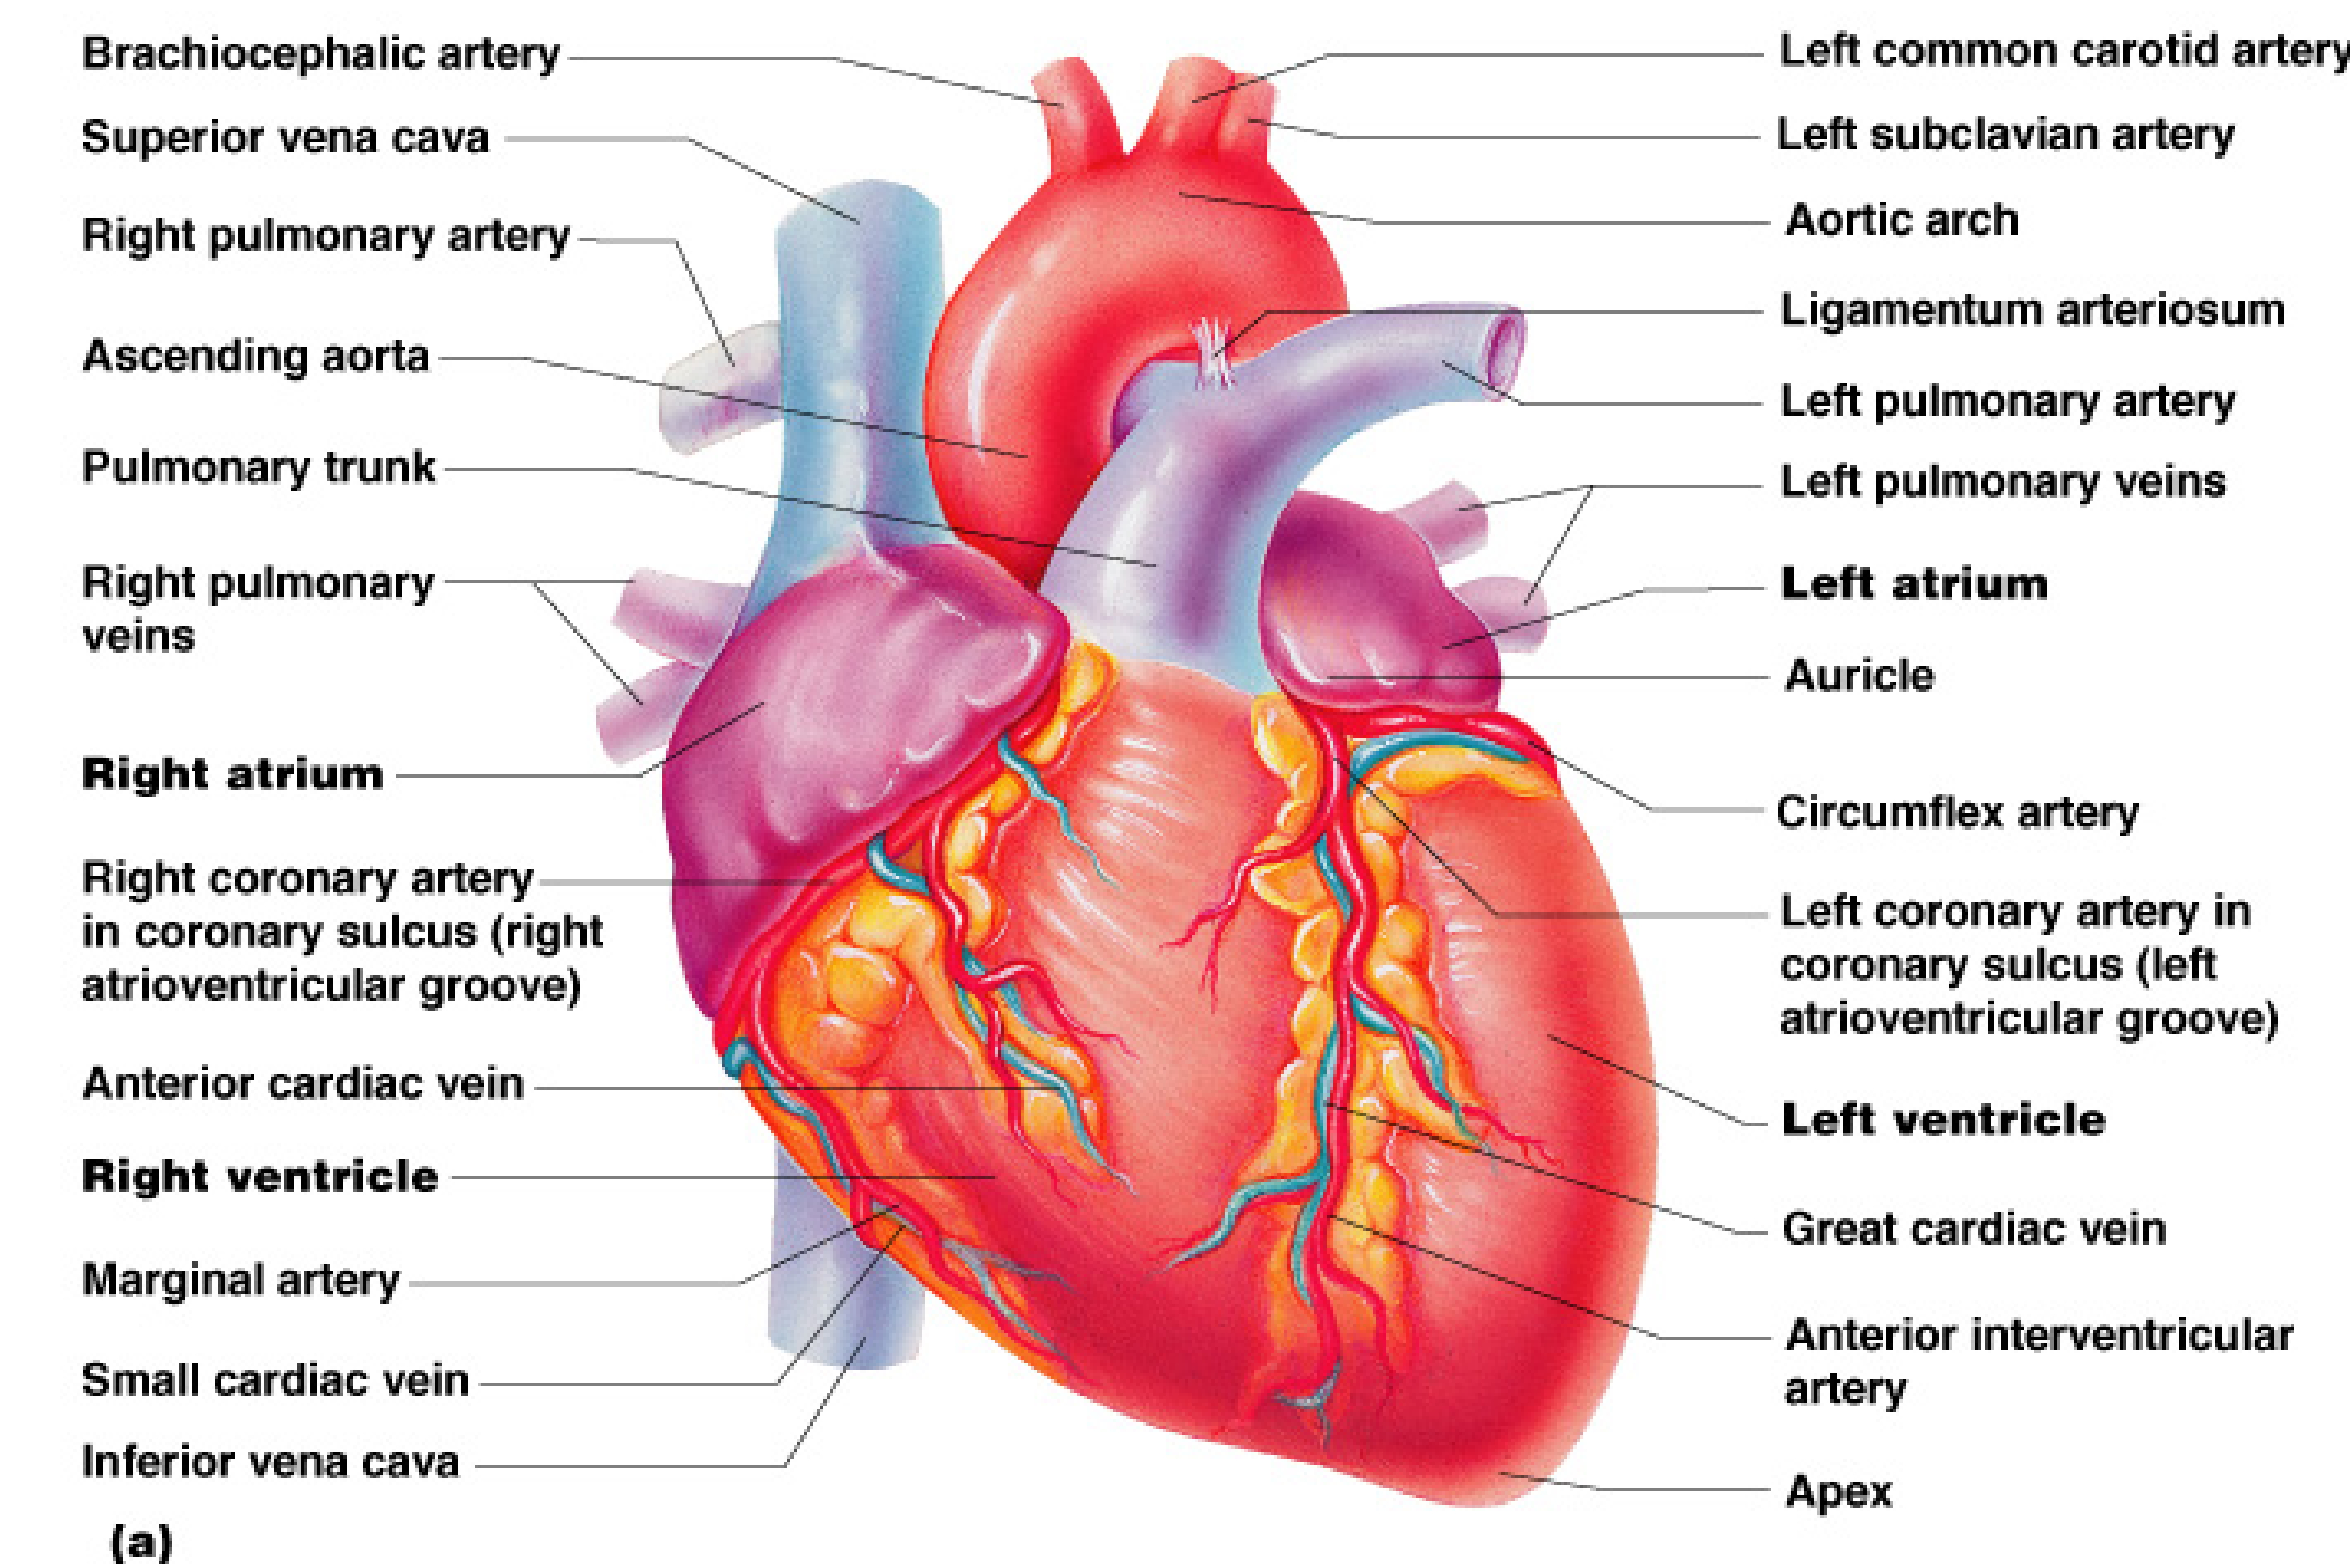
Heart anatomy details
| Structure | What it does | Why it matters or warning signs |
|---|---|---|
| Superior vena cava | Returns deoxygenated blood from the head and arms to the right atrium. | Persistent face or neck swelling, shortness of breath, or unexplained fatigue needs evaluation. |
| Inferior vena cava | Returns deoxygenated blood from the abdomen and legs to the right atrium. | Leg swelling with breathlessness can signal circulation strain. |
| Right atrium | Collects deoxygenated blood before it passes to the right ventricle. | Palpitations or new rhythm changes should be assessed. |
| Tricuspid valve | Keeps blood flowing from the right atrium to the right ventricle. | Murmurs, swelling, or fatigue can signal valve issues. |
| Right ventricle | Pumps blood to the lungs through the pulmonary artery. | Shortness of breath or leg swelling can indicate right sided strain. |
| Pulmonary valve | Prevents backflow into the right ventricle. | New murmurs or dizziness with exertion need review. |
| Pulmonary artery | Carries deoxygenated blood from the heart to the lungs. | Chest pressure or breathlessness can signal pulmonary pressure issues. |
| Pulmonary veins | Return oxygenated blood from the lungs to the left atrium. | Persistent cough or breathlessness can reflect congestion. |
| Left atrium | Receives oxygenated blood before it enters the left ventricle. | Irregular heartbeat or fatigue can be tied to atrial arrhythmia. |
| Mitral valve | Keeps blood moving from the left atrium to the left ventricle. | Shortness of breath or rapid fatigue can signal valve leakage. |
| Left ventricle | Main pump that sends oxygenated blood to the body. | Chest pain, fainting, or severe fatigue need urgent evaluation. |
| Aortic valve | Controls blood flow from the left ventricle into the aorta. | Dizziness or chest pain with exertion can signal valve narrowing. |
| Aorta | Largest artery distributing blood throughout the body. | Severe chest or back pain can be an emergency. |
| Coronary arteries | Supply oxygen to the heart muscle itself. | Chest pressure, jaw or arm pain, or heavy squeezing can indicate a heart attack. |
| Interventricular septum | Muscle wall separating the left and right ventricles. | Defects can cause murmurs and reduced exercise tolerance. |
| SA node | Primary pacemaker that initiates each heartbeat. | Very slow or very fast rhythms should be evaluated. |
| AV node | Electrical relay that times the signal to the ventricles. | Dizziness or fainting can be a sign of conduction block. |
| Bundle branches and Purkinje fibers | Distribute the electrical signal through the ventricles. | Irregular rhythm or skipped beats can indicate conduction issues. |
| Myocardium | Heart muscle that contracts to pump blood. | Inflammation or thickening can reduce pumping efficiency. |
| Endocardium | Inner lining of the heart chambers and valves. | Fever with a new murmur can signal infection. |
| Pericardium | Protective sac that surrounds the heart. | Sharp chest pain that changes with position can reflect inflammation. |
Blood flow pathway
- Body returns blood through the superior and inferior vena cava.
- Right atrium receives the blood.
- Tricuspid valve opens to the right ventricle.
- Pulmonary valve sends blood into the pulmonary artery.
- Lungs oxygenate the blood.
- Pulmonary veins return oxygenated blood to the left atrium.
- Mitral valve opens to the left ventricle.
- Aortic valve sends blood into the aorta and out to the body.
Electrical conduction pathway
- SA node fires and sets the heart rhythm.
- AV node delays the signal for proper filling.
- Bundle of His and bundle branches carry the signal downward.
- Purkinje fibers spread the signal through the ventricles.
This anatomy guide is educational. Symptoms can have many causes and require professional evaluation.
Medical disclaimer
This calculator is for education and planning only. It does not provide medical advice, diagnosis, or treatment.
- Consult your clinician before starting a new exercise program.
- Stop exercising if you feel chest pain, dizziness, or unusual shortness of breath.
- Heart rate zones are estimates and vary by fitness level and medications.
How to use this calculator
- Enter your age, resting heart rate, and target intensity.
- Select a max HR formula or use a measured max HR.
- Review your target heart rate and zone table.
- Export results to PDF, Excel, or CSV for training plans.
How to use this calculator in practice
Daily Training Steps
This calculator blends your age, resting heart rate, and chosen intensity to estimate a training target using heart rate reserve. The reserve method adjusts for your baseline and can feel more personal than simple percent-of-max formulas. You enter your inputs, pick a max heart rate method, and the tool translates the percentage into a target bpm plus a small range for day-to-day variance.
Resting Heart Guidance
Resting heart rate is a key anchor because it reflects how your body behaves when calm. Measuring it in the morning while seated or lying down helps reduce noise from caffeine, stress, or recent movement. Using a more stable resting value improves your zone estimate so the intensity you select matches your actual effort. The calculator keeps this step simple and reminds you to take an average across multiple days.
Heart Reserve Method
Heart rate reserve uses the difference between max and resting heart rate. It then applies your intensity percentage to that reserve and adds the resting value back. The result is a target that scales with fitness. A lower resting heart rate means a larger reserve, and your calculated target rises accordingly for the same intensity. This is why two people of the same age can see different targets.
Max Formula Comparison
The calculator includes two well-known formulas and an option for a measured max. Each formula is an estimate, so the comparison table shows how different methods can shift your target. If you have a supervised max heart rate test, using that value is typically more individualized. If not, the formula table helps you see the realistic range that most adults will experience.
Intensity Zone Visuals
The zone wheel gives you a quick visual of where your selected intensity sits within easy, moderate, aerobic, threshold, and peak zones. Each segment represents a percentage band of heart rate reserve, and the marker points to your target. This helps you decide whether a session should feel like a long, steady effort or a short, high-output workout.
Safety Stop Signals
The safety list highlights common cautions without replacing medical advice. It adapts to high intensities, very low or high resting heart rates, and custom max values. It also repeats standard stop signals such as chest pain, fainting, or severe shortness of breath. If any of these occur, the safest action is to stop and seek medical evaluation.
How to use this calculator in depth
Target Zone Planning
This calculator gives you a single target heart rate plus a zone table that maps the full training spectrum. The table shows easy, moderate, aerobic, threshold, and peak ranges so you can match the right effort to the right workout. A simple endurance run can stay in moderate zones, while interval work sits higher. The result is less guesswork and more consistent training quality.
Intensity Gauge Visuals
The intensity gauge shows your chosen effort on a clean progress bar, while the zone wheel places that effort in context. These graphics are designed for quick checks during planning or on a phone screen. The range band around your target allows for normal daily swings in heart rate caused by sleep, hydration, temperature, or stress, which helps you stay flexible and avoid overcorrecting.
Formula Range Comparison
Many people see different results between standard and Tanaka formulas. Instead of hiding the differences, the comparison table displays them so you can understand the range of likely values. This makes your plan more resilient because you will know if your target is already near the higher end or if you have room to adjust. If you have a measured max, the table still shows how close formulas are to your actual number.
Session Guidance Bands
The guidance section highlights the most common training bands used in public health recommendations and athletic programs. It separates moderate, vigorous, and peak ranges so you can pair each with the right goal. Long sessions are easier to sustain in the moderate zone, whereas vigorous sessions are shorter and more demanding. Peak work is best used sparingly with full recovery and preparation.
Talk Test Checks
Heart rate is only one way to judge intensity. A simple talk test can help validate your zone, and a perceived exertion scale can catch days where heart rate is unusually high or low. If you use a wearable, compare its numbers with your target to make sure your device is reading accurately. These cross checks help keep your training steady even when conditions change.
Resting Rate Trends
Tracking resting heart rate over weeks can show training adaptation or fatigue. A rising resting value can signal stress, poor sleep, dehydration, or illness. The calculator is not a diagnostic tool, but it helps you see how your baseline affects daily targets. If changes are persistent or accompanied by symptoms, consult a clinician.
Heart Anatomy Alerts
The heart diagram explains the main chambers, valves, and arteries, along with general warning signs. It is meant to help you recognize when exercise should stop and medical care is needed. Sudden chest pain, fainting, or severe shortness of breath are urgent. Less severe but persistent symptoms should still be evaluated by a professional.
Clinical Clearance Needs
Some people should obtain medical clearance before high intensity training, including those with known heart conditions, uncontrolled blood pressure, or pregnancy complications. Medications like beta blockers change heart rate response and can make target zones less accurate. If you are unsure, bring your results to a clinician or a certified exercise professional for personalization.
Exportable Report Sharing
The PDF, Excel, and CSV exports capture your inputs, target ranges, and zone guidance in a structured format. This makes it easy to share with a coach, include in a training journal, or reference during a checkup. The exports mirror the on-screen results so you can keep the same plan across devices without rebuilding it.
What this calculator includes
- Karvonen method target heart rate using heart rate reserve (HRR).
- Multiple max HR formulas, including Tanaka and custom inputs.
- Zone table for recovery, moderate, vigorous, and peak effort ranges.
Karvonen method summary
- Max HR is estimated from age or measured directly.
- Heart rate reserve = max HR - resting HR.
- Target HR = resting HR + (HRR x intensity).
Measuring resting heart rate
- Measure first thing in the morning before caffeine or activity.
- Count beats for 30 seconds and multiply by two.
- Track over several days and use the average.
References (clinical guidance)
- American Heart Association: Target heart rates
- CDC: Physical activity basics
- NHS: Exercise guidance
- British Heart Foundation: Target heart rate
- Tanaka, Monahan, and Seals (2001): Age-predicted maximum heart rate
- American College of Sports Medicine: Exercise prescription overview
- WHO: Physical activity guidelines
Additional trusted resources
Search topics covered
- target heart rate calculator
- karvonen method calculator
- heart rate reserve zones
- max heart rate formula
- resting heart rate guide
- training intensity zones
- moderate exercise heart rate
- vigorous exercise heart rate
- peak heart rate zone
- cardio training bpm
- zone 2 heart rate
- fitness heart rate target
- heart rate zone table
- workout heart rate range
- heart rate reserve formula
- exercise safety heart rate
Q&A
What is the Karvonen method?
It uses heart rate reserve (max minus resting HR) to estimate training zones.
Which max HR formula should I use?
Use a measured max if you have it, otherwise start with 220-age or Tanaka.
Why does resting heart rate matter?
It personalizes intensity so your zones reflect true effort.
What is a good resting heart rate?
It varies by fitness level. Many adults are between 60-80 bpm.
What is moderate intensity?
Moderate is typically 50-70% of heart rate reserve.
What is vigorous intensity?
Vigorous is typically 70-85% of heart rate reserve.
Can medications affect heart rate zones?
Yes. Beta blockers and other medications can lower heart rate response.
Why do my zones feel too easy or hard?
Fitness level, stress, sleep, and hydration can shift perceived effort.
Should I train in one zone only?
Many programs mix zones based on goals, recovery, and experience.
Is this a substitute for a stress test?
No. Clinical exercise testing is more precise and supervised.